You've purchased seed, sown, potted up, planted on, fed and watered the results are in - you've successfully grown bushels of tender green indigo ( Persicaria Tinctoria)
The choices of what you do with your plants are plentiful. 'Happazome", raw leaf dyeing, salt leaf dyeing.
For this article the focus is to procure your own beautiful deep blue indigo pigment, with which to create your own vat, ink, paint or chalks and crayons, employing the hydro method of soaking plants to release the pigment.
You will need;
Calcium hydroxide also known as; builders lime, picking lime or Calx for this article will be referred to as Lime, which is readily available on Amazon at food grade.
N. B. It is paramount when using Lime you add lime to liquid and not visa versa.
2 x storage containers for your indigo
1 mixing bowl
1 whisk ( optional)
1 x teaspoon
A sieve
A dust mask. Super important when dealing with calcium hydroxide powdered form
Rubber gloves
Fine muslin or cotton cloth to fit your sieve
Piece of silk to line sieve or coffee filter.
Ph strips or Apera PH Meter.
Ready?
Step 1.
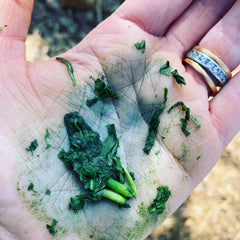
Check indigo pigment is present. Simply pluck the top leaves and crush into a ball of juicy green in the palm of your hand. Within 5 mins - 10 mins the sap from the leaves will turn from green to blue as it comes into contact with your personal ph and air. For a less messy alternative simply pinch the tips of your indigo or crinkle a leaf and the colour will show up after 30 mins or so. indigo is offered in all manner of sized leaf the smaller the better some may thing. Harvesting at regular intervals at 5 - 6 weeks and feeding on a weekly basis is good practise.
But for fun, and entertainment lets stay with this, With the color test rendering blue the alchemy can begin but you don't really need messy paws... so lets proceed.
Ensure your plants are weed free before harvest, any other material other than the indigo itself can alter pigment results, even inhibit the indigo pigment from truly dropping out. Cut plants leaving a good 4" for regrowth and any new tender shoots. This advice is for those of you with shorter and cooler summer months. I've talked about this and shared the information in instastories.@bailiwickblue "Indigo Alchemy"
Place plant material into a large vessels, size of which will largely depend on your harvest. Most use storage containers, or barrels
Pack the indigo down, but don't crush, fill vessel with water to cover branches and weight the plants beneath the surface of the water.

Use whatever you have available, in my case its ice-cream containers filled with water to weight down branches and leaves.
In the hydros method, the plant releases Indican into the water, Indican separates into two parts, sugar, and indoxyl. The reaction occurs within 3-5 days depending on the outdoor temperature, the warmer the day the quicker the reaction.
Over the next three days inspect the surface water. Pigment will be seen collecting on the surface and around items used to weight down the plant matter, in a purple blue sheen. The water will become a luminous turquoise green thru teal colour.
While we mostly talk visuals, there is also an important note to make regarding the "Ready" aroma; a high sweet smell with a lower warm green undernote, many of you are already aware, however, for the new indigo growers in the crowd it is an important factor to be aware off because indigo gone to far is no-ones friend.

YES sometimes plastic bottles as weights.
Once you have a visual confirmed by the aroma remove all plant material, and screen the liquid through a fine muslin cloth, filter bag or cotton into the second clean vessel to remove any tiny pieces of indigo debris and tiny wildlife. ( sad but it happens)

Step 2.
Now the indoxyl is released and ready for the aeration process with an increased ph. Altering the ph and incorporating oxygen captures the indigotin, the indigo pigment with which we dye.
Gloves and Masks ON please! Lime is caustic so protection is definitely required.

Create a slurry, taking up a small amount of the freshly screened indigo liquid, or filtered water, I recommend 100 ml to start, add a teaspoon of lime, and blend in well. Increase the amount of lime gradually, until the consistency is that of maple syrup. Increase the amount of liquid, so as the lime shows a drop out of Calcium or white paste at the bottom of your lime container. You'll be left with a near clear indoxyl but for the tinge of blue or clear lime water. This can take half and hour to an hour to separate.
Alternatively, you can also use Lime putty, though this is less frequently found at the hardware store but from specialists. This then removes the dust element from the equation. The putty can then be broken down through a sieve into rice sized particles to blend it into your chosen liquid.
You will notice an instant change in colour as the lime acts to capture indigotin available in the liquid. But before adding anything READ ON!

For 20-100 Litres of indoxyl, 4 tblspn of lime should be prepared and blended prior to commencing aeration.
Before adding Lime, aeration of the indoxyl is mandatory..... either pouring back and forth between containers, which at a small 15l-20l scale is a personal preferrence. For larger scale circa 150- 200l and upward a submersible pump is ideal.
Aeration is extremely important. The incorporation of carbonic acid from atmospheric CO2 assists the lime water in the collection of pigment.
Aerate for 5 - 10 mins. Over aeration can result in finer particles and therefore pigment will take longer to drop out and will also be difficult to handle in future rinses.
Once aeration is complete, stir in the lime water / indoxyl. Be careful to retain the lime residue or calcium particulate, which can be recycled by adding more filtered water so creating more lime water to have at hand and add if need be to the indoxyl to raise the ph further. 
The colour of the indoxyl will gradually change as lime water is stirred in. no further aeration should be required.
At a ph of 9/9.5 changing from mermaid to indigo blue. At this point you may be tempted to stop. However, for complete acquisition of indigo pigment a ph of 11.11.5 is noted as giving good results. This higher ph is also dependent and determined by the quality or purity of the lime used.
As the ph rises bubbles usually but no always dissipate, on the surface of the liquid. Within the liquid you should see the movement of dark blue particles billowing.
There are two tests which can be undertaken at this juncture. The white plate test, to check for particle size. Scoop a little liquid out and let it settle on a white plate. Give it 4-5 mins then tap you plate to see the pigment collect itself.
The other test, with a black light torch. "The Skye special". The black light when shone at the surface should shine back dark indigo blue. If the indoxyl has not converted completely, the light picks up on the seductive mermaid undertone... raise your ph please and add more lime water with a good stir.
If you PH measure is good, dark flocculant apparent, down tools! The indigo will need a good 24 hours to settle to the bottom of the vessel. You've had your work out, time for a cuppa.
Day 2
Time to screen off the supernatant which will be yellow or pale bluey green, depending on how much lime you decided to add. Remember less lime gives a much cleaner indigo. More lime a faster process. More lime will give you the colour below, this is not necessarily a good thing to have super defined separation.

Gently remove the excess liquid, we call it the "supernatant" above the indigo pigment and set aside. Pour out the pigment. Add water to half the volume of water used in the alchemy process, this is to rinse and remove the odour of the lime. Allow the pigment to settle once more.
The second drop out will be quicker, it is best to allow 12-24 hours for the pigment to totally drop out.
The surplus supernatant, should be treated with either white vinegar or citric acid or more water the ph reduced to 7 for safe disposal. If you are growing madder reduce the lime water with additional water to ph 8 or 9 and feed to your madder plants.
Day 3
Line your sieve, with cotton, silk or coffee filter paper.
Screen off as much water as possible from atop of the pigment, pour out the pigment into the lined sieve. Give the pigment 1-6 hours to sit, in sieve, propped on a vessel for excess water within the paste to drip out completely. You can transfer your paste to dry further into a lined basket or tray.
Place out of direct sunlight and leave to dry, some like refrigeration others like poly tunnels...some do direct sun. Should moulding become apparent use anitfungal, antiviral & antibacterial Oregano Oil blended in filtered water and spray over the surface area or your drying paste. For faster drying consider breaking up the paste into smaller pieces which will also assist in speeding up the grinding process later.

Once completely dry, it's time to grind and hydrate your very own small batch indigo and set to work on your very own "Sustainable Indigo vat".
For further reading and inspiration on how to use Persicaria Tinctoria a.k.a indigo plant, please take a moment to check out these wonderful ladies on instagram and via their websites.
@dogwooddyer Liz Spencer Dogwooddyer Chock Full of intel on the many ways of indigo and applicationsand other natural dyes, and techniques.
@dreambird.studio Iris Sullivan Daire DreamBirdStudio
@indigoblueskye Skye Macalester
@indigobluefields Luisa Uribe www.indigobluefields.com
@naturesrainbowhitchin Susan Dye & Ashley Walker www.naturesrainbow.co.uk
https://naettla.com Julia Tabakhova
@seaspellfiber Brittany Boles
Brittany Is also the founder | creator of Facebook page "Indigo Extraction Pigment Method" which is brimming with information and shares so much good and good information you will not be alone in your quest for knowledge and meeting like-minded souls.
georgexx
Fantastic!! Thank you so much for the step by step details. I am off to give it a go this weekend. What is the approximate yield of pigment from weight of fresh leaves? I only have a few plants!
George, you are a star. Thank you for mentioning me in your blog and for sharing your process with us! Xx